


Instalace
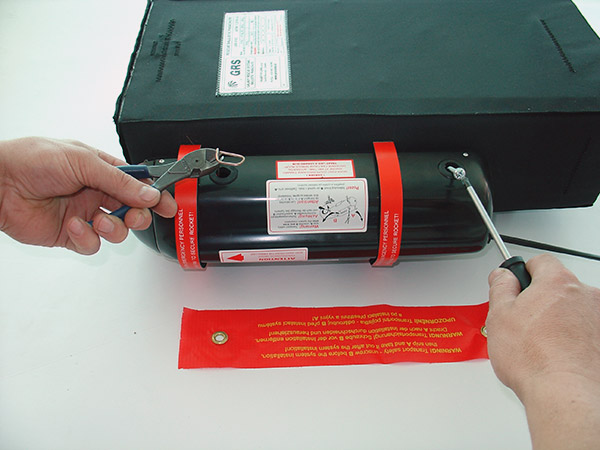
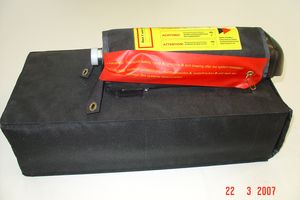
Nová modifikace upevnění rakety bez textilního překrytu
PLATNÉ PRO REVIZE
VAROVÁNÍ!
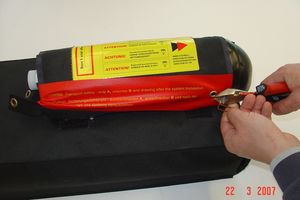
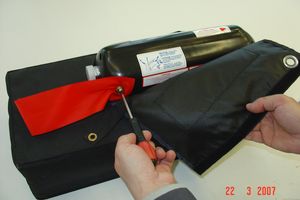
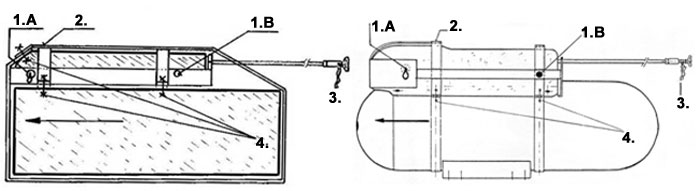
Tyto dvě přepravní pojistky jsou pevně spojeny červeným praporkem mezi sebou a musí se postupně vyjmout!
Po vybalení z přepravního obalu se nejprve odšroubuje pojistka B v zadní části raketnice (v případě že se jedná o Soft balení, je nutno odklopit horní textilní kryt raketnice na velcro zipech a šroub M5 vyjmout). Červený praporek zůstane do doby, než je systém nainstalován na pojistce! Po instalaci systému se přestřihne a vyjme drátěná pojistka A s červeným praporkem a systém je nyní jištěn pouze provozním pinem na praporku rukojeti.Ten je vyjímán pilotem těsně před letem a po letu opět zajištětuje rukojeť před možným spuštěním.
POZOR: Jestliže není kabina uzamykatelná je nutné rukojěť uzamknout!
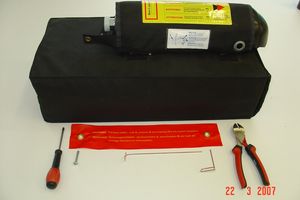
Balení produktu
- Přepravní pojistka A, B
- Ochranný ocelový koš
- Provozní pojistka zasunuta a zajištěna červenou nití!
- Zajištěno 2 šrouby M5
PŘED EXPEDICÍ NÁS PROSÍM KONTAKTUJTE !
Avant l´achat merci de nous contacter!
SZÁLLÍTÁS ELŐTT ÉRTESÍTSE A GYÁRTÓT!
PRIMA DELLA SPEDIZIONE CONTATTATECI!
Przed wysłaniem systemu skontaktuj się z producentem aby uzyskać najnowsze informacje.
Před montáží je uživatel povinen přečíst řádně příručku Vašeho GRS. Neuposlechnutí nebo přehlédnutí důležitých informací při instalaci a montáži nebo údržbě podle tohoto návodu a rad v něm obsažených může vést ke zranění Vaší osoby nebo smrti Vás nebo pasažérů a poškození letounu.
Máte-li jakýkoliv dotaz nebo Vám je některá část nejasná, zavolejte nebo napište nám dříve, než byste udělali jakoukoliv chybu. Společnost GALAXY si přeje, abyste plně pochopil způsob užívání GRS pro bezpečnost Vaši i pasažérů. Nepředpokládejte, že můžete zaměnit jakoukoliv část GRS podobnou částí, kterou si můžete sami obstarat. Tato příručka je vyčerpávající pro proces řádné montáže potřebné pro bezpečnou instalaci a pro řádné používání systému. Za žádných okolností se neodchylujte od popsaných metod nebo dodaných komponentů dříve, než byste dostali od GALAXY schválení.
Možné instalace pro další typy letadel
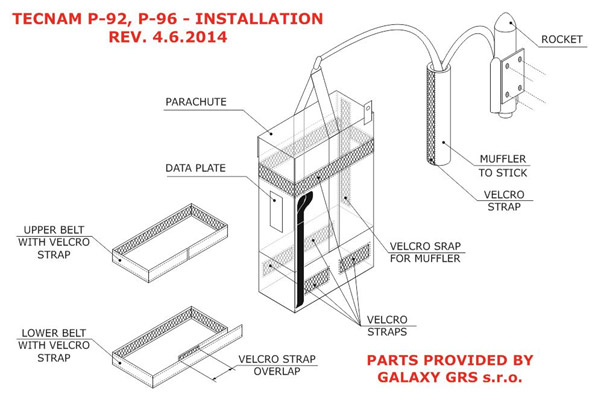
TECNAM P-92, P-96 - INSTALLATION
According to new verified GRS Galaxy installation, there is no need for duct to carry the combustion gases out of the fuselage!!!
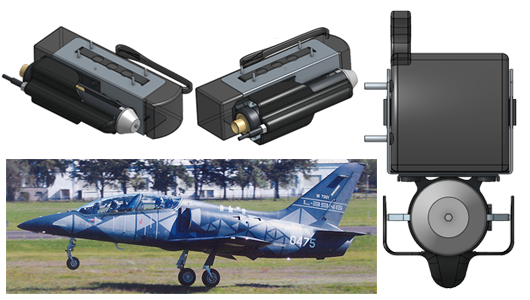
This parts are provided by Galaxy GRS s.r.o.:
NOTE: The assembly provided by Galaxy GRS s.r.o. already contains two belts with Velcro® straps.
Because of its peculiarities, the GRS Galaxy rescue system needs some extra care during its installation. In fact:
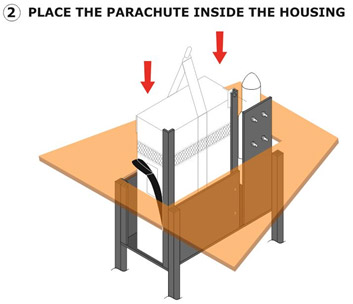
- The parachute’s bag must be fastened so as to lift-off without hindrances.
- According to our latest findings, there is no need for duct to carry the combustion gases out of the fuselage! Critical factor is the vertical position of the rocket in the box. This is the major change in this installation manual revision. See more details below.
Rocket and Parachute’s bag lodging and fastening
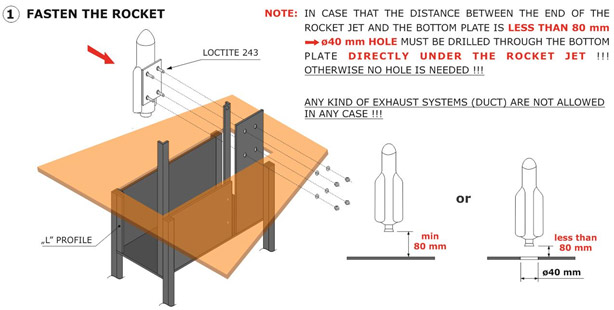
- Fasten the rocket by using 4x M5 self-locking nuts and washers. Use a thread locker Loctite (243 Medium strength). There is no need for duct to carry the combustion gases out of the fuselage. Critical factor is the vertical position of the rocket in the box. Under the rocket jet there must be a free volume for combustion gases dispersion. In case that the distance between the end of the rocket jet and the bottom plate is less than 80 mm, 40 mm diameter hole must be drilled through the bottom plate. This will provide a sufficient pressure release.
- Set the parachute’s bag at the left side of the box i.e. the side with the two “L” shaped stringers.
- Secure the parachute´s position with lower and upper belt with Velcro® straps. These belts must fit with opposite Velcro® “hooks” on the bag and must be pressed properly. The upper belt must wrap the parachute’s bag fastening it to the stringers but not wrapping the rocket. It does not have an overlap. Because of the plate which is between the parachute´s bag and the lower belt, the lower belt has 3-5cm overlap. Unused lower belt ending should be cut off. The lower belt must never interfere with the parachute’s bag bail out process. Safety needle must be applied (detail A).
NOTE: This installation of the lower belt is valid for a box with 2 solid sides only according to the picture below.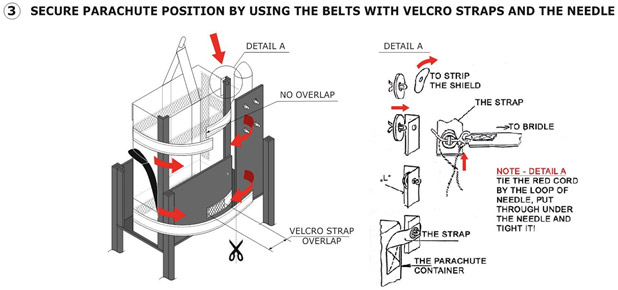
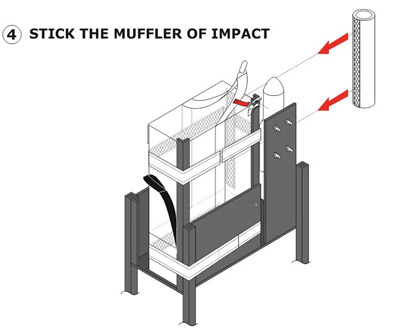
- Stick the muffler of impact
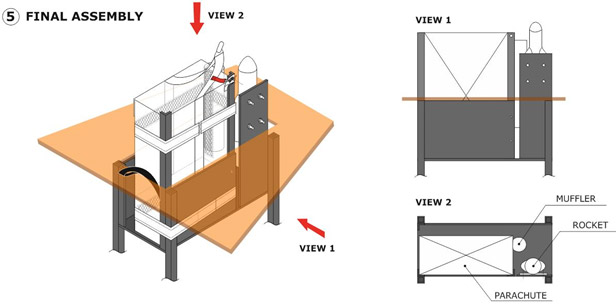
- Final assembly
- These aircrafts don’t have any stringers coming up from the top of the tail cone. Because of this it will be necessary to proceed as we did on the lower belt. The Velcro® tape should wrap up the parachute’s bag with the aluminium box. If necessary it is also possible to drill a 10x35mm slot into the aluminium box exactly in height of lower Velcro “hooks” on the bag (without damaging the bag) to pass through the belt without wrapping the rocket. The purpose of this installation is to introduce a “disconnection point” into the upper belt which must never results as a hindrance to the parachute’s bail out, while fastening the bag. Therefore the belt’s overlapping length must be limited to the strictly necessary, e.g. about 3-5cm.
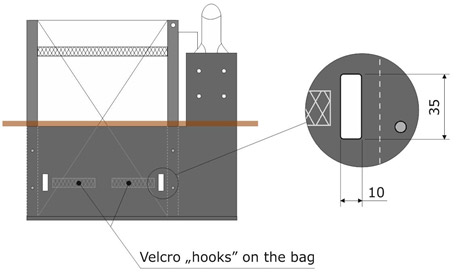
Note for lower belt with Velcro strap Installation on P92/96/RG in case that the aluminium box has all sides solid:
Download: Emergency parachute installation on Tecnam ultralight aircrafts.
P92 Echo, P92-S Echo, P92 EchoSuper, P92 ShortWings, P92 SeaSky, Astore, P2008
P92 Echo 2000 RG, P96 Golf, P2002 Sierra